 Click
here to hear TagYerit's song SciFi (first half) in RealAudio while you enjoy
some of our carvings.Click
here to hear TagYerit's song SciFi (first half) in RealAudio while you enjoy
some of our carvings.
Click
here to hear TagYerit's song SciFi (first half) in RealAudio while you enjoy
some of our carvings.Click
here to hear TagYerit's song SciFi (first half) in RealAudio while you enjoy
some of our carvings.

| 1998 - 2001 | 2002 - 2004 | 2005 | 2006 | 2007 | 2008 | 2009 | 2010 | 2011 - 2013 | 2014 - ? |
The pumpkins you find on these pages were either done by Rich & Flo Newman (aka TagYerit) or sent in by friends & contributors. There could easily be 10 pages by now, so give yourself plenty of time to explore the vast range of wonderful creations assembled here!
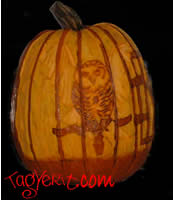
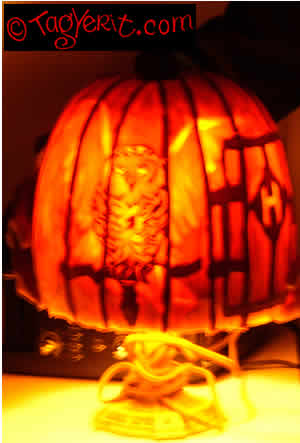
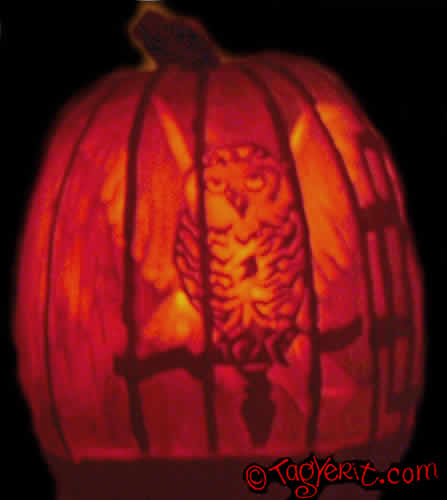
Three views of HedwigHedwig is holding a howler envelope. Flo realized that the natural pumpkin form would be just right for the shape of Hedwig's cage. The pumpkin is cut across the bottom (instead of the top) just like the cage would be. This also gave us the chance to see what it would look like set atop a lamp base as if it was a lamp shade. When the light is off,, (small pic on right) Hedwig looks like his wings are folded. When it's lit, his spread wings appear. |
|
 |
|
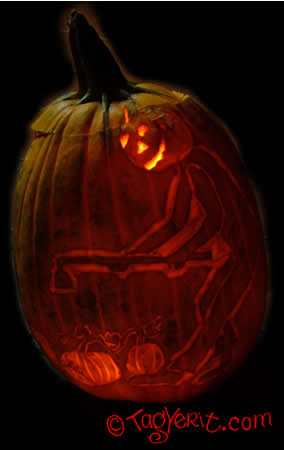 |
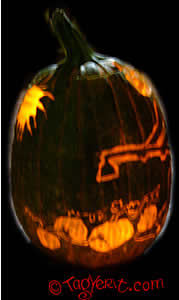
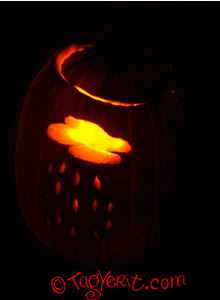
The Pumpkin FarmerOur housemate Pat grew some pumpkins and this green pumpkin had broken off the vine. I did a portrait of Pat tending his pumpkin patch. Not only did the pumpkin turn completely orange after I carved it, but it definitely kept longer than others since it was drier than other pumpkins that I've carved in the past. Over 2 weeks before it started to rot . The middle picture, showing the sun, was taken while the pumpkin was still green. The rain cloud was cut out on the back.
|
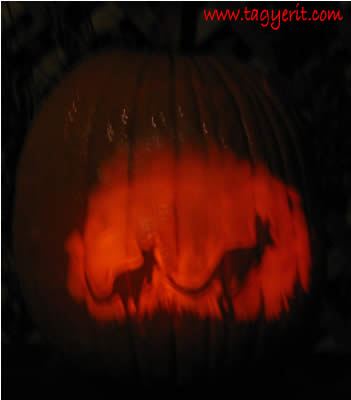 We
were looking to carve a kangaroo themed pumpkin.
We
were looking to carve a kangaroo themed pumpkin.
An online search brought us to http://www.bergoiata.org/fe/animaux02/10.htm
which was such a great photograph and here's the result -
We made this for Dahlia to celebrate her first birthday. She lives in Massachusetts
but has already been to Australia and there's a great photo of her mom and her
in front of a kanga-mom and her little roo.
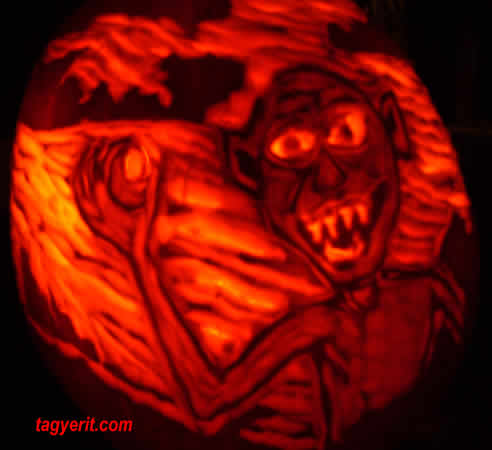
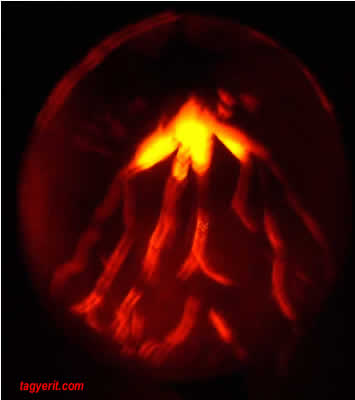
So, it was ten days after Halloween and we still had one pumpkin uncarved. Finally found a few hours. As you'll see below Lee Ellis had sent in her pictures of Smeagol, but I had been contemplating a different treatment of Gollum complete with Mt. Doom on the back and using the color of the light for the lava flowing.. So here is "Gollum's Moment of Truth"
: ~ <> : ~ <> : ~ <> : ~ <> : ~ <> : ~ <> : ~ <> : ~ <>
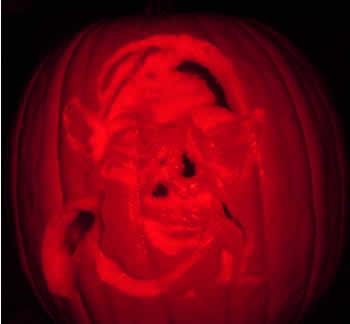
Lee Ellis sent these pictures Smeagol (a.k.a. Gollum) took her 4 hours from start to finish. She provided pictures of the unlit pumpkins, so you can see how it was done. Essentially the design you carve is a like a negative. The areas that are black in the unlit pumpkin are white in the lit pumpkins, the areas that are uncarved come out black and the orange aeas have the skin peeled and some of the pumpkin flesh cut away to allow some light through.

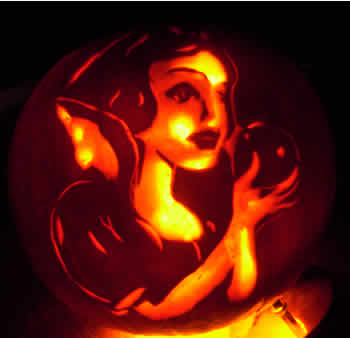
Here, Snow White contemplates the Apple
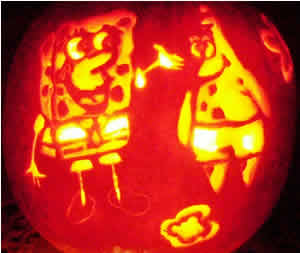
Sponge Bob and Patrick
Snoopy rests atop the Great Pumpkin
Several pumpkin sculptures have found us recently. I'll probably have to add a pumpkin sculpture page for these assemblages soon.
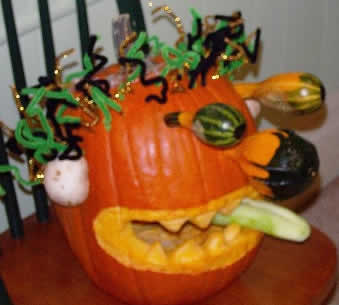
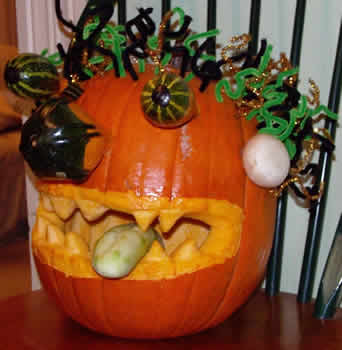 Tiffany
Lane sent in pictures of this colorful guy. "We did an awesome pumpkin
for a contest at my daughter\'s middle school, adapted from an idea we found
on your site. and then put a multi-color light in the top (not shown). The produce
guy at the grocery store suggested the ears!! We used a skinned cucumber for
the tongue...not sure if it is better with or without..."
Tiffany
Lane sent in pictures of this colorful guy. "We did an awesome pumpkin
for a contest at my daughter\'s middle school, adapted from an idea we found
on your site. and then put a multi-color light in the top (not shown). The produce
guy at the grocery store suggested the ears!! We used a skinned cucumber for
the tongue...not sure if it is better with or without..."
- - - - - - -- - - - - - - - - - - - - - - - - - - -- - - - - - - - - - - - - - - - - - - -- - - - - - - - - - - - -
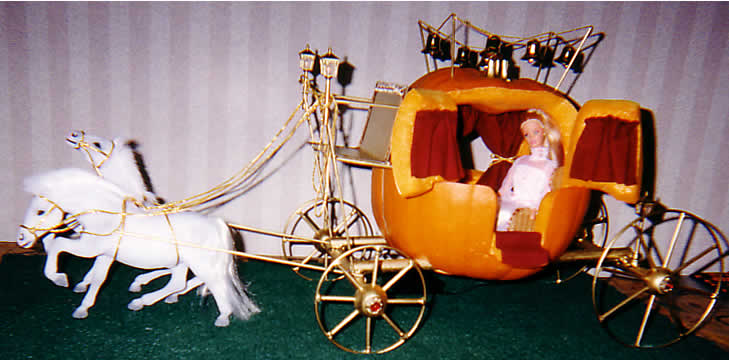
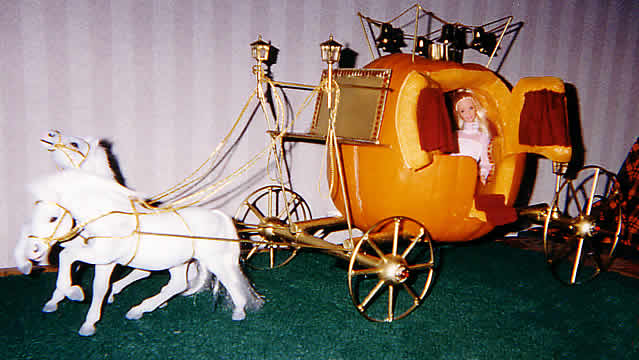
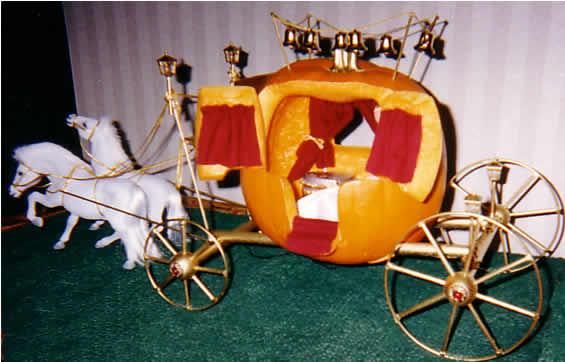
Here's a pumpkin sculpture created by Forrest Hickst in 2001. But it just found
it's way to us, we're showing it with the 2005 pumpkins.
Pumpkin facts: 2001 Pumpkin Contest Winner
"Materials used - wood dowel rod, brass rings, brass bells, gold rope,
battery powered street lights for train set as carriage lights, red velour,
1 Barbie, horses from kids toy box, astro turf, and wifes' jewelry box (see
inside by Barbie's legs), hot glue, gold spray paint, ruby buttons, cardboard
and gold/red ribbon. and of course a pumpkin - 14 hours to make. Got endless
Barbie jokes since - next time I'll do something with GI Joe!" Forrest
Hicks
If you have any pumpkin pictures that you'd like to post, Contact us
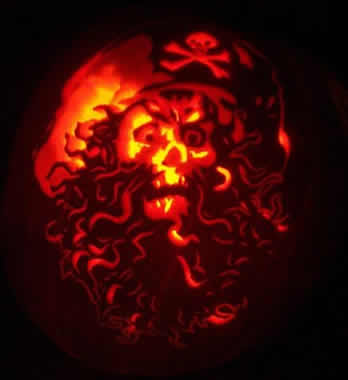
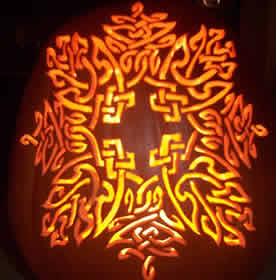
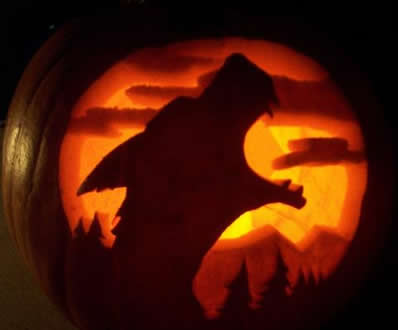
Lisa Luera is a recent convert to pumpkin carving. But she's obviously working hard to make up for lost time. Within 3 years she has probably carved over 50 pumpkins. Here's three of her originals. Click here to see more
When I asked Lisa to tell me about her pumpkins, there was no holding her back,
"Unfortunately I can't take the credit for most of the amazing designs!
I just happen to be the addicted pumpkin carver. I have gotten patterns from
most of the popular pumpkin sites out there. The Pumpkin Wizard's site is where
I got started ... My original carvings are patterns that I have created from
pictures I found on the net. I'm still getting the hang of that down. ... So
many cool designs, so little time to carve! My originals were Curly Beard Pirate,
both celtic knots, Moonlight Owl, Howling, The Smurfs, InuYasha, Happy Thanksgiving,
and Turkey Hunt.
I began my pumpkin carving "addiction" in 2003. My office had a pumpkin
carving contest, and my competitive side kicked in. I started searching the
net for ideas, or for intricate designs that I could carve. I had done a few
jack-o-lanterns in years past, but never anything really difficult. That's when
I stumbled across the Pumpkin Wizard's site. I carved Haunted House, Cauldron
Witch and Dr. Evil for the contest. For the carving category of the competition,
Haunted House won 1st place, the witch 2nd place, and the Dr. Evil got 4th place.
The Haunted House also got grand prize.
That's when the addiction really set in. I had so much fun carving for the contest,
but then halloween was over and I had just found a really cool new hobby. So
I asked all of my family and friends if they had any left over pumpkins at their
house. That's when I carved Tigger and all of the Thanksgiving pumpkins.
So in 2003 I carved 9 designs on 7 pumpkins. In 2004, my husband and I bought
our first house. That's when I started planning for my first display. I had
21 pumpkins on display that year (One of them was a giant 3 ft pumpkin). I taught
my mom how to carve that year.... she had 2 in the display. I carved more earlier
in the month that didn't make the display. I also held workshops at my office
and my mom's office and taught several other people how to carve. 2004 was also
the year I bought myself a dremel and started carving on the foam pumpkins.
In 2005, I started carving the foam pumpkins in early August. This allowed me
to have more in my display without having to cram all the carving in the last
week of October. I had 37 pumpkins on display with 43 patterns on them. 20 of
the pumpkins were real (another giant one thrown in this year) and the rest
were artficial. All of them were carved this year with the exception of one.
I was hired by Michael's Arts and Crafts store to do in store demonstrations
and teach carving classes as well. So I carved several pumpkins during the season
for demos that didn't make it to the Halloween display.
As far as preserving my pumpkins, the best way I have found is to put them in
a grocery bag and stick them in a fridge. I actually did an experiment on one
of my demo pumpkins. I stuck it in the fridge and would pull it out every saturday
and display it while I was carving a new one. The pumpkin actually lasted 3
weeks and still looked as good as the day I carved it. I finally threw it away
because I had a more intricate design I wanted to keep for the Halloween display
and was out of room in the fridge. I started carving for my display about a
week and a half in advance. By the time Halloween rolled around, I ended up
with 7 pumpkins in my fridge, 5 in my Mom's fridge, and 6 floating in cool water
in my bathtub. The rest of them that didn't get a fridge or tub spot were carved
on the night before or the actual day. They don't last long out of the fridge.
Especially in our Texas sun. I decided to photograph the pumpkins this year
as they wilted. (none of them molded... just dried out). It only took 48 hours
before most of them were unrecognizable. Then we had a smashing pumpkins party
that involved me smashing them on the ground and my husband cutting them up
with a shovel so we could get them all to fit in our trash bin. Click
here for pictures of "The Aftermath".
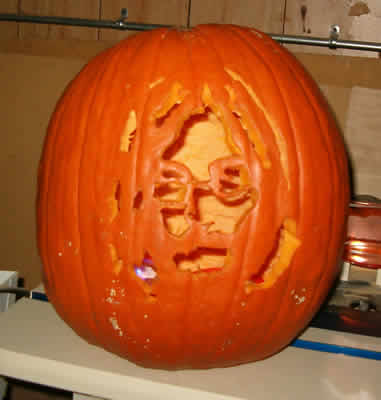
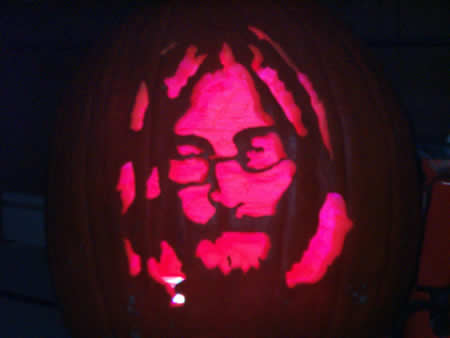 Brian
Gilroy sent us this portrait of John Lennon. This is Brian's first pumpkin made
from a stencil that he got off the web. He tells us, he's now addicted and going
to try to come up with us his own stencils.
Brian
Gilroy sent us this portrait of John Lennon. This is Brian's first pumpkin made
from a stencil that he got off the web. He tells us, he's now addicted and going
to try to come up with us his own stencils.
The next pic is how it looks unlit.
 I have never worked this way, but Brian was asking for suggestions on making
his own stencils. No guarantees, but to make your own stencil, try the following
tutorial along with some additional tweaking.
I have never worked this way, but Brian was asking for suggestions on making
his own stencils. No guarantees, but to make your own stencil, try the following
tutorial along with some additional tweaking.
"Converting
a colour photo to a single layered stencil with Photoshop" by stencilrevolution
My guess is that you'll have to tweak it from there to get thicker lines. If
you cut & paste the stencil over itself and slightly offset a few times
it might work. Thicken the lines and then experiment with simplifying them.
I'm not sure, since I never tried it, but that's how I'd approach it if I were
to try.
The tutorial is for photoshop, but any good graphic programs should be set up
to do the same thing.
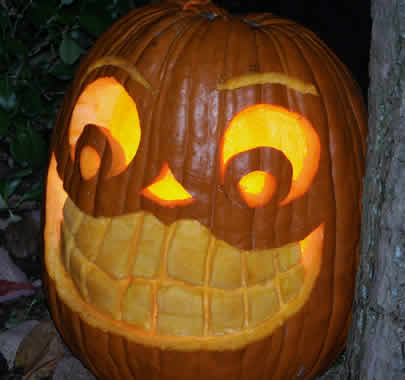 This cheery guy is a creation of Bill Woodier. You can read Bill's Halloween
memoirs at his website.
This cheery guy is a creation of Bill Woodier. You can read Bill's Halloween
memoirs at his website.
Or, if you'd like to start by reading about his interest in pumpkin carving,
then go here first: http://www.bill-woodier.com/halloween5.htm.
The examples of his pumpkin carvings, including this beauty, can be found starting
at
http://www.bill-woodier.com/halloween2002.htm
Keep going, there's so much to see!